Apr 13 2023
At the end of 2022, there were approximately 6.65 billion smartphone users worldwide, with mobile app revenue projected to reach $270 billion by 2025. As the world becomes increasingly mobile-centric, it's more important than ever for businesses to have a strong presence on mobile devices. However, with so many different platforms and devices available, building a mobile app that works seamlessly across all of them can be a time-consuming, costly, and complicated process. This is where cross-platform app development comes in. Cross-platform app development refers to the process of building apps that can run on multiple platforms, such as Android and iOS, using a single codebase.
One of the most popular frameworks for cross-platform development is Flutter, an open-source framework developed by Google. With Flutter, you can build high-quality, natively compiled beautiful and responsive apps for Android, iOS, web, and desktop, all from a single codebase. This makes it the perfect choice for startups, entrepreneurs, and established organizations looking to build cross-platform apps quickly and efficiently.
Hire the Best Flutter App Development Company
Let our comprehensive guide assist you in choosing the right Flutter app development company
Learn MoreThe Future is Flutter
Since its launch in 2017, Flutter is steadily gaining popularity in the app development industry, with more and more developers and businesses adopting it for cross-platform development. As per the research by, AppBrain, there are more than 27,000 thousand apps created over Flutter, with their downloads crossing a staggering 15 billion.
Flutter benefits from a large community of developers, with Google providing significant support. Developers who use Flutter report bugs to Google, ensuring swift resolutions. The platform has over 25,000 repositories on GitHub, making it easier to hire Flutter developers.
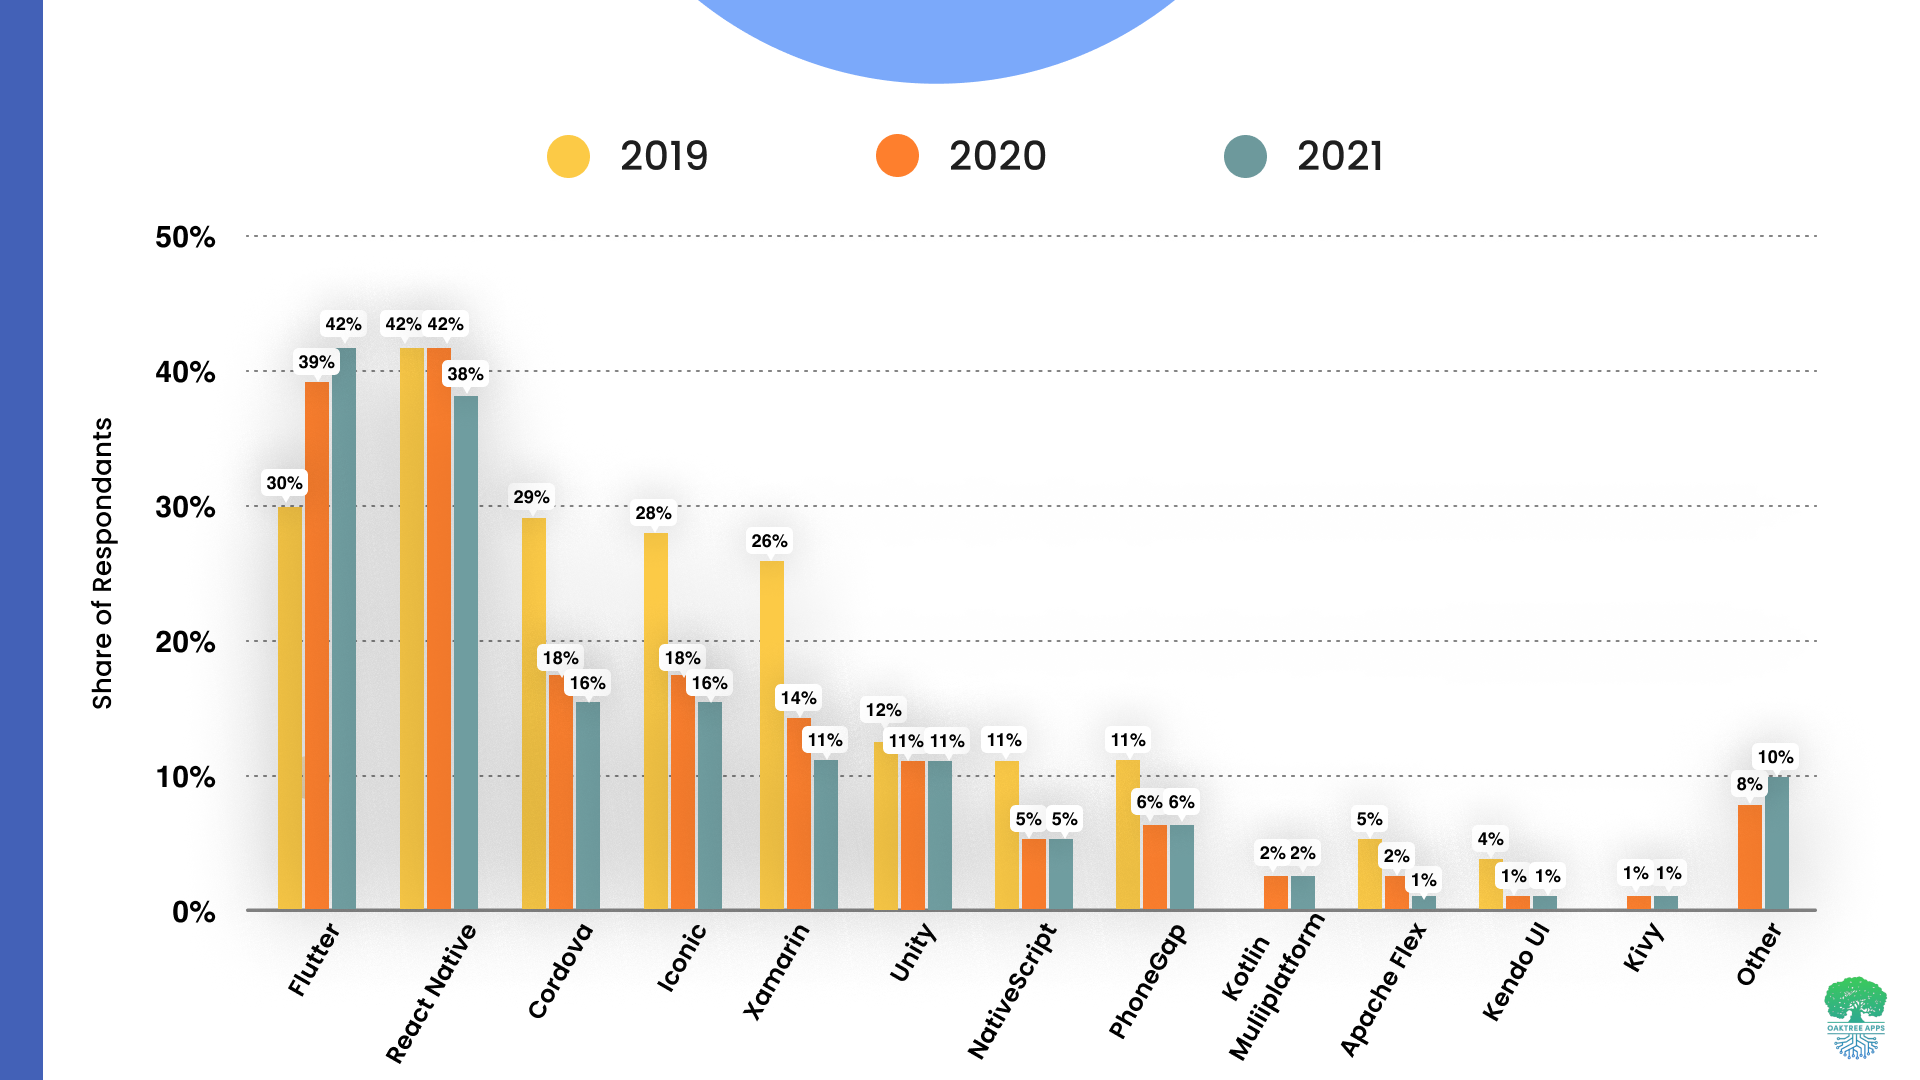
Research suggests that Flutter's popularity will only increase in the coming years. In a survey conducted by Google in 2021, developers found Flutter to be the most preferred cross-platform development framework, with 46% of respondents choosing it as their top choice.
Integration with Google Technologies: Flutter seamlessly integrates with other Google technologies such as Firebase, Google Cloud, and Google Maps. This integration can significantly reduce the time and effort required to integrate these technologies into the application, making it an attractive option for businesses heavily invested in Google technologies.
AI-powered Tools and Plugins: Google's investment in AI technology means Flutter can benefit from AI-powered tools and plugins. These tools can significantly improve the development process, providing features such as automatic testing, intelligent code completion, and smart debugging.
Increasing Popularity: As more businesses adopt Flutter, it will attract more developers to the platform, leading to a larger community of developers who can share knowledge, tools, and resources. This growth will make Flutter a more mature platform with a robust ecosystem of tools, making it a reliable option for businesses in the future.
Improved Compatibility: Flutter is designed to be highly compatible with various operating systems and devices. As businesses aim to provide a consistent user experience across all devices, Flutter's compatibility with multiple platforms will make it an attractive option in the future.
Advantage of using Flutter for cross platform app development
Hot Reload for Instant Changes: Flutter's Hot Reload feature enables developers to make changes to the code in real-time, resulting in increased productivity and faster iteration times, as developers can see the impact of their changes instantly. This feature accelerates the development process and improves productivity.
Flexible and Expressive UI: Flutter provides an expansive library of highly scalable widgets that make it highly flexible and expressive, enabling the development of customized interfaces and giving developers complete control over the look and feel of their apps.
Native features: Flutter provides access to native features, allowing developers to access them using Objective-C, Swift, or Java. Unlike most cross-platform frameworks, Flutter doesn't require intermediate code representations, and the applications are integrated directly into the machine code.
Developer experience: Flutter provides best-in-class IDE support through IntelliJ/Android Studio and Visual Studio Code plugins. The platform only requires developers to be familiar with the Dart programming language, making it easier to create mobile applications.
Single Codebase for Multiple Platforms: Flutter allows developers to build apps for multiple platforms, including iOS, Android, web, and desktop, using a single codebase, thus significantly reducing development time and costs compared to building separate apps for each platform.
High Performance: Flutter uses Dart, a high-performance programming language optimized for client-side development, which makes it faster than other frameworks. Additionally, Flutter's architecture allows for smooth and responsive animations and transitions, resulting in a better user experience.
Wide Range of Plugins: Flutter has a vast library of plugins that can be easily integrated into the app, including plugins for maps, social media, and payment gateways. This saves developers time and effort and provides access to many features and functionalities.
Efficient and Portable GPU Rendering: Flutter leverages efficient and portable GPU rendering UI, which allows it to work on multiple interfaces, including those with the latest technology, ensuring that apps are fast, responsive, and provide an optimal user experience.
Quality Assurance Testing: Flutter provides a command called Flutter Doctor that automates the quality assurance testing of the app, enabling developers to identify and rectify any bugs in real-time.
Advanced APIs for Smooth Animations: Flutter leverages advanced APIs that make app animations look cleaner, faster, and smoother. It uses 2D GPU-accelerated API, which keeps the animations clear and crisp, resulting in an engaging user experience.
Architectural Overview
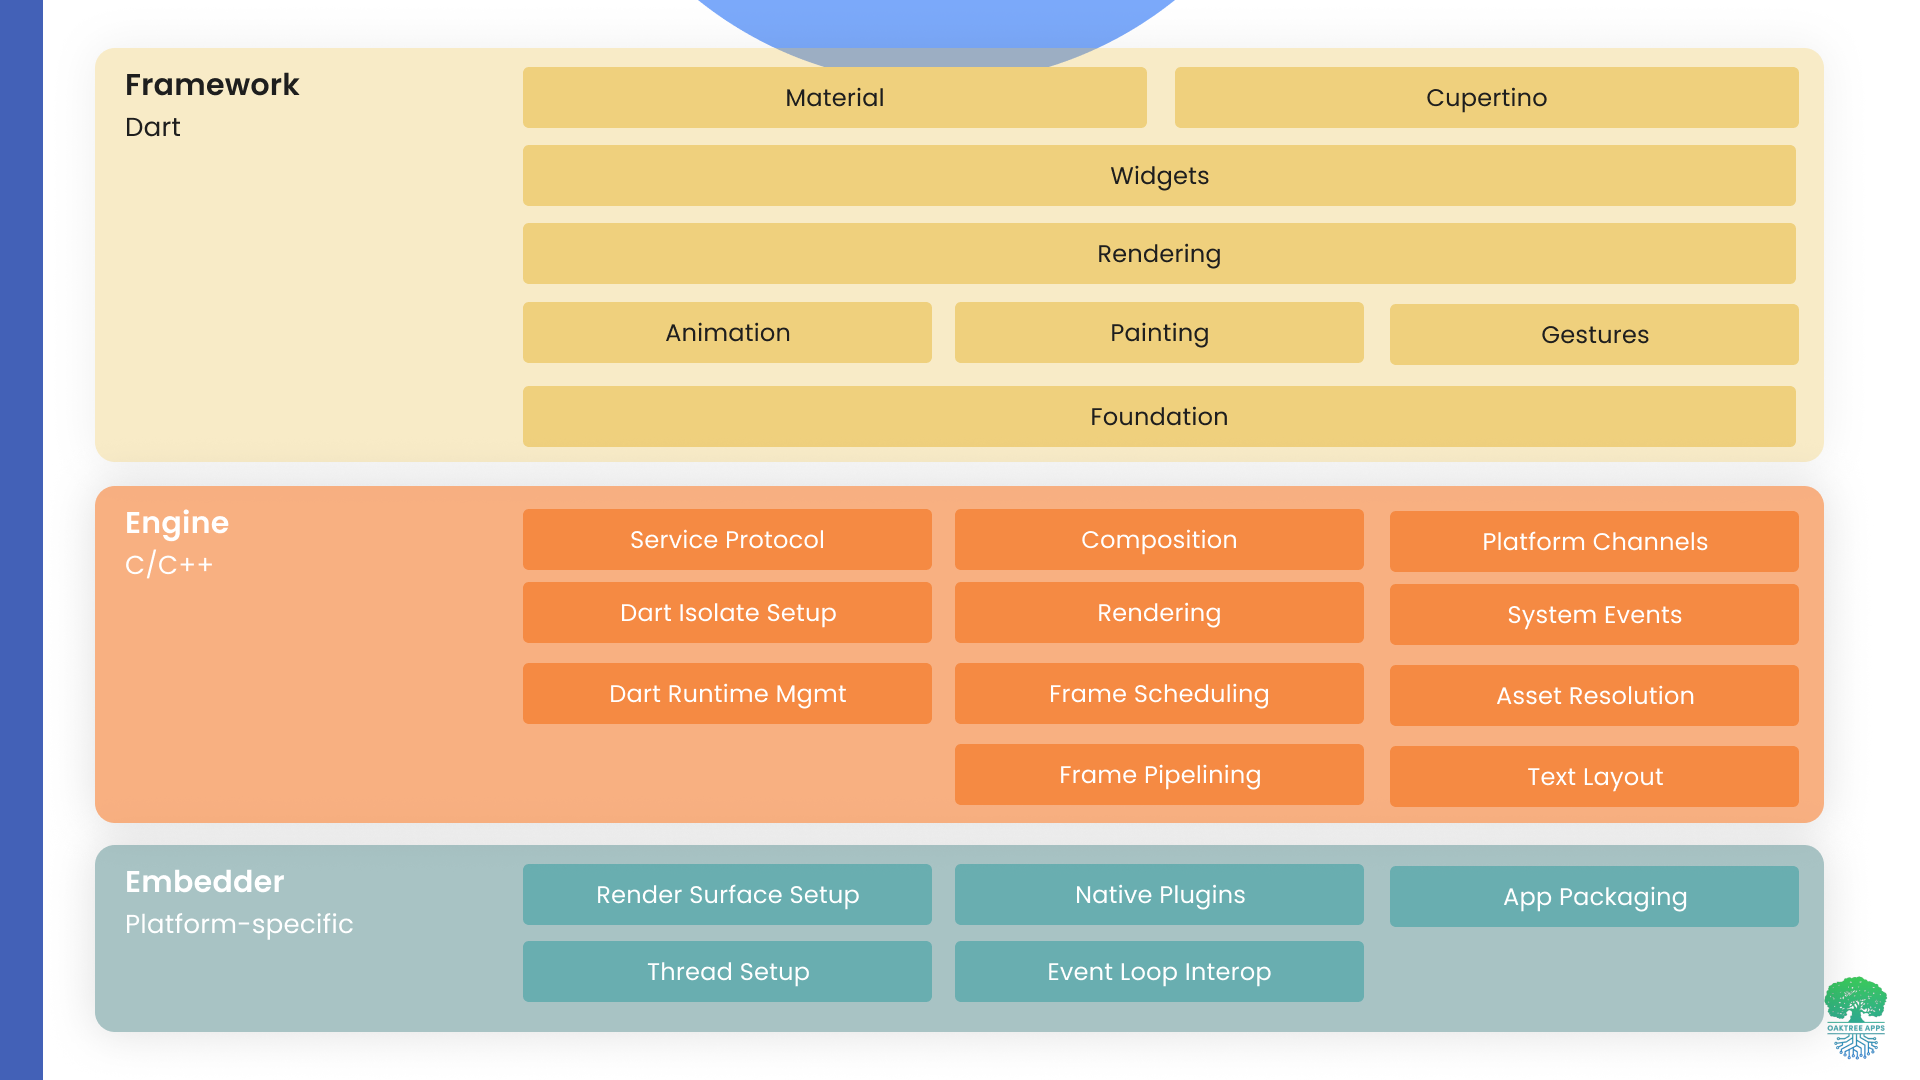
Framework: Flutter's framework is written in Dart, an object-oriented language with C-style syntax that is optimized for client-side development. The Flutter framework includes a set of libraries and tools that allow developers to create and customize widgets and layouts, handle user input, and manage application state.
Flutter's engine is written in C++ and provides the low-level rendering, input, and layout functionality that is needed to create high-performance mobile applications. The engine includes a fast GPU-accelerated 2D and 3D rendering engine, a high-performance input event handling system, and a flexible and efficient layout system.
Flutter's embedder layer is platform-specific and provides the necessary code to integrate the Flutter engine and framework with the underlying platform. The embedder layer includes platform-specific plugins and APIs that allow developers to access platform-specific features such as camera, storage, and location services. The embedder layer also includes platform-specific code for packaging and deploying the Flutter application on the target platform, such as Android or iOS.
Building a Cross-platform web app in Flutter
Before building cross-platform apps with Flutter, you need to set up our development environment. Here are the steps to set up your environment:
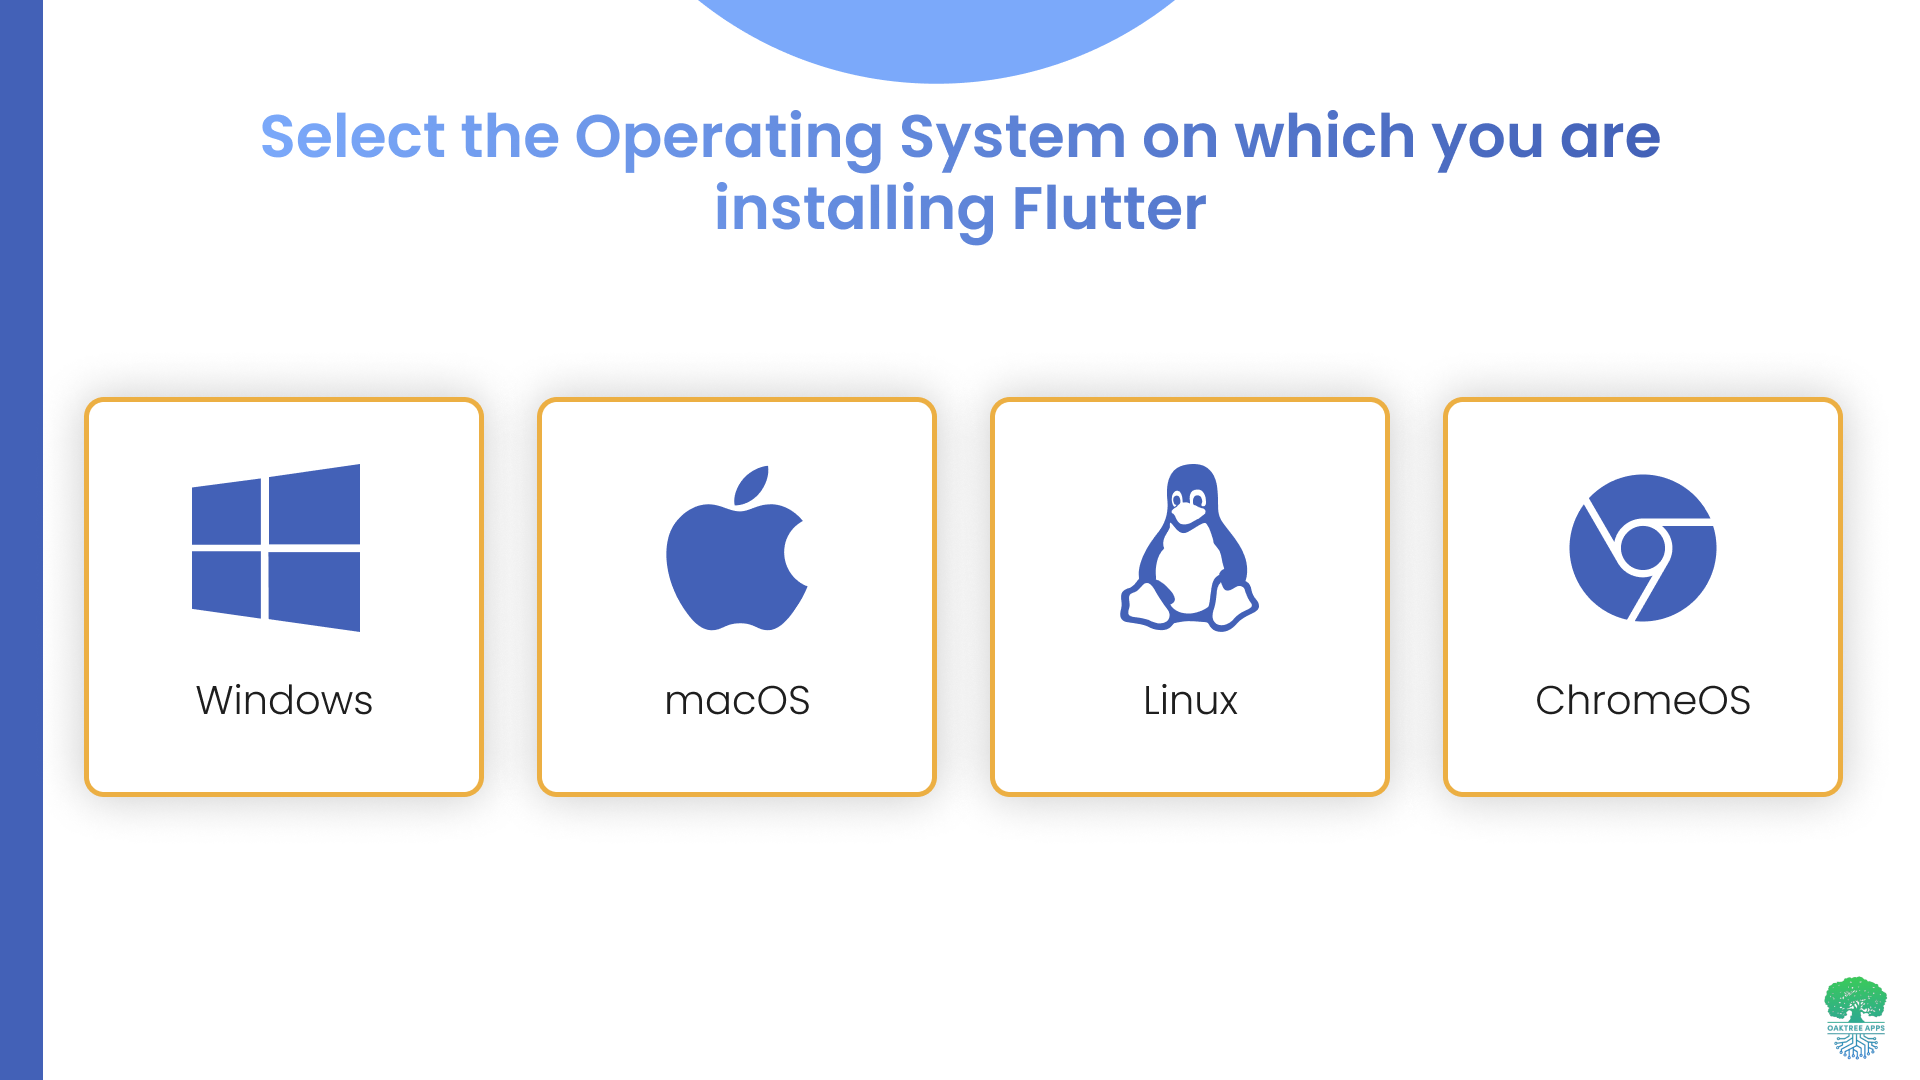
Installing Flutter and Dart: The first step is downloading and installing Flutter and Dart:
a. Go to the Flutter installation page: https://flutter.dev/docs/get-started/install.
b. Choose your operating system and follow the instructions to download the Flutter SDK.
c. Extract the downloaded file and place the Flutter folder in a desired location.
d. Add the Flutter SDK path to your system's PATH environment variable.
Installing Android Studio or VS Code: Once you have installed Flutter, you need to install an integrated development environment (IDE). The two most popular IDEs for Flutter development are Android Studio and Visual Studio (VS) Code.
Installing an IDE:
b. Follow the installation instructions for your operating system.
Configuring the Android emulator or iOS simulator:
a. If you're developing for Android, you'll need to set up the Android emulator to test your app. If you're developing for iOS, you'll need to set up the iOS simulator.
b. To set up the Android emulator, open Android Studio and select AVD Manager from the toolbar. Click on "Create Virtual Device", choose a device type and system image, and click "Finish".
c. To set up the iOS simulator, open Xcode and select "Preferences" from the menu. Go to the "Components" tab and download the iOS simulator. Once downloaded, select "Open Developer Tool" and then "Simulator" to launch the iOS simulator.
Verifying the installation:
a. Open a terminal window and run the following command:
flutter doctor
b. This command will check if Flutter is installed correctly and report any issues that need to be resolved.
You can refer to the official documentation or community forums for help if you encounter any issues during the installation or setup process.
Creating a new Flutter project
Once you have set up your development environment, you can create a new Flutter project. Here are the steps:
Creating a new Flutter project using the Flutter CLI or IDE:
a. Open your terminal or command prompt and run the following command to create a new Flutter project:

flutter create project_name
b. Replace project_name with the desired name of your project. This will create a new Flutter project with the default project structure.
Alternatively, you can also create a new Flutter project using an IDE. Here are the steps for Android Studio and Visual Studio Code:
Android Studio:
Click "File" in the toolbar and select "New Flutter Project".
Choose "Flutter Application" as the project type and click "Next".
Enter the project name and click "Finish".
Visual Studio Code:
Open the command palette (Ctrl+Shift+P on Windows/Linux or Cmd+Shift+P on macOS).
Search for "Flutter: New Project" and select it.
Enter the project name and select the project location.
Understanding the project structure:
The default project structure created by Flutter CLI or IDE consists of the following folders and files:
lib/: This folder contains the main code of your app.
test/: This folder contains test code for your app.
ios/: This folder contains the iOS-specific code for your app.
android/: This folder contains the Android-specific code for your app.
pubspec.yaml: This file contains the metadata and dependencies for your app.
Running the app on the emulator or simulator:
a. Open the emulator or simulator you set up in the previous section.
b. In your terminal or command prompt, navigate to your project directory.
c. Run the following command to launch the app on the emulator or simulator:

d. The app will start running on the emulator or simulator, and any changes you make to the code will be hot-reloaded in real-time.
After completing these steps, you have created a new Flutter project and run it on the emulator or simulator. You can start building your app by modifying the code in the lib/ folder.
Design the user interface
Flutter provides a wide range of widgets and layouts that you can use to create a responsive and attractive user interface. You can use the MaterialApp widget to define your app's theme and layout, and then add additional widgets such as Text, Container, and Button to create your UI.

The example demonstrates the MyHomePage widget that extends the StatefulWidget class. The build() method of the widget returns a Scaffold widget that provides the basic structure for the screen.
The Scaffold widget includes an AppBar widget that displays the title of the screen and a ListView.builder widget that displays a list of items. The ListView.builder widget builds each item in the list using a ListTile widget that displays the item text.
We have also added a FloatingActionButton widget that displays an "Add" icon. A new item is added to the list when the user taps on this button.
When designing a UI in Flutter, it's important to keep the principles of Material Design in mind. Material Design is a set of guidelines for designing user interfaces that are consistent, predictable, and intuitive. Flutter's widgets are designed to follow these guidelines, making creating UIs that adhere to Material Design principles easy.
Recommended Flutter packages to build a responsive UI for a cross-platform web application
One of the benefits of using Flutter for building cross-platform app is the extensive ecosystem of third-party packages. These packages can be used to add additional functionality to your app and save time during development. Many third-party packages are available for UI components in Flutter, ranging from simple widgets like buttons and text fields to complex components like charts and animations. Some popular packages for UI components include:
Flutter Layout: This package offers a set of responsive widgets that can be used to create complex UI layouts.
Flutter ScreenUtil: This package allows developers to make their Flutter UIs responsive to different screen sizes and resolutions.
Flutter Material Responsive: This package provides a set of responsive widgets and utilities for building Material Design-compliant UIs.Flutter Flex: This package allows developers to build flexible, responsive UI layouts using a Flexbox-style system.
Flutter Bootstrap: This package provides a set of Flutter widgets and utilities designed to mimic the Bootstrap framework, making it easy to build responsive UIs for web applications.
Flutter Material Components (https://pub.dev/packages/fluttermaterialcomponents): A set of widgets that implement the Material Design guidelines, including buttons, cards, text fields, and more.
Flutter Cupertino (https://pub.dev/packages/cupertino): A set of widgets that implement the iOS design language, including navigation bars, tab bars, and more.
Flutter Awesome (https://pub.dev/packages/flutter_awesome): A collection of pre-built widgets and UI components, including icons, buttons, and text fields.
Flutter SVG (https://pub.dev/packages/flutter_svg): A package that allows you to display SVG images in your app, which can be resized and styled just like any other widget.
Implementing business logic
Once you have your UI designed, it's time to start implementing the business logic of your app. This involves creating classes representing data models and services, implementing data persistence using databases or cloud services, and handling network requests and asynchronous operations:
Creating classes for data models and services
In Flutter, you can create classes representing your app's data models and services. For example, if you're building a to-do list app, you might create a class called "Task" to represent a single task item and a class called "TaskService" to handle CRUD operations for tasks. These classes should be designed to be as reusable as possible so that they can be easily adapted to different use cases in your app.
Implementing data persistence using SQLite or Firebase
In Flutter, you can use SQLite, Firebase, or other databases to store data locally or in the cloud. For example, if you're building a weather app, you might use a local SQLite database to store weather data offline. Alternatively, you might use Firebase to store user data and synchronize it across devices.
Implementing network calls using HTTP or WebSocket
Many apps require network calls to fetch data or interact with APIs. In Flutter, you can use HTTP or WebSocket to handle network requests. For example, if you're building a news app, you might use the News API to fetch news articles and display them in your app. You can use the http package in Flutter to handle HTTP requests or the web socket_channel package to handle WebSocket requests.
Handling asynchronous operations using async/await
Asynchronous programming is an important concept in Flutter, as many operations like network requests and database access can take a long time to complete. In Flutter, you can use async/await to handle asynchronous operations.
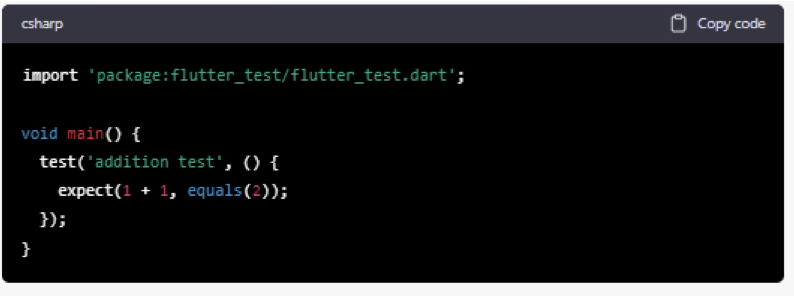
Testing and debugging
Testing and debugging are crucial steps in any software development process. Flutter provides a built-in testing framework to write and run automated tests for your app, ensuring that your code works as intended. You can also use the Flutter DevTools to debug and profile your app.
Example of a small test:
Flutter provides tools like the Device Preview plugin allowing developers to preview their apps on different device configurations.
Using Flutter DevTools for debugging and profiling:
Flutter DevTools is a set of tools for debugging and profiling Flutter apps. It provides a user interface that allows developers to inspect the app's state, debug issues, and optimize performance.
To debug your app using Flutter DevTools, first, run your app in debug mode by clicking the "Debug" button in your IDE or running the flutter run --debug command in your terminal. Then, open the Flutter DevTools in your web browser by navigating to http://localhost:8080. You can use the DevTools to inspect the widget tree, view logs, and analyze performance issues.
Deploy your Cross Platform App
Once you have finished building and testing your app, you can generate release builds for Android and iOS. You need to use the Flutter build command to generate release builds for Android and iOS. For example, to generate a release build for Android, you can use the following command:
How much does it cost to develop a cross-platform app using Flutter?
The cost of developing a cross-platform app using Flutter can vary based on a few factors, such as the app's complexity, the number of features it needs, the platforms to be supported and the developer's hourly rate. On average, the cost of developing a cross-platform app using Flutter can range from $20,000 to $50,000, depending on the abovementioned factors. However, it's important to note that these are just ballpark figures, and the actual cost can vary widely based on the project's specific requirements.
As a web development company, we understand the importance of delivering high-quality software solutions that meet our clients' needs and provide value to their users. We have extensive experience developing cross-platform apps using Flutter, and we can help you create a product that meets your specific requirements.
Conclusion
In conclusion, building cross-platform apps with Flutter is a great option for startups and businesses looking to develop apps that work seamlessly on multiple platforms.
If you're looking to build a cross-platform app with Flutter, feel free to contact us. We'd be happy to discuss your project requirements and provide you with a quote.
FAQs
You can build cross-platform applications using Flutter by writing code once and compiling it for Android and iOS platforms. Flutter provides a rich set of pre-built widgets and tools to build high-performance, visually attractive mobile apps that run seamlessly across multiple platforms.
Some popular alternatives to Flutter for developing cross-platform applications include React Native, Xamarin, and Ionic.